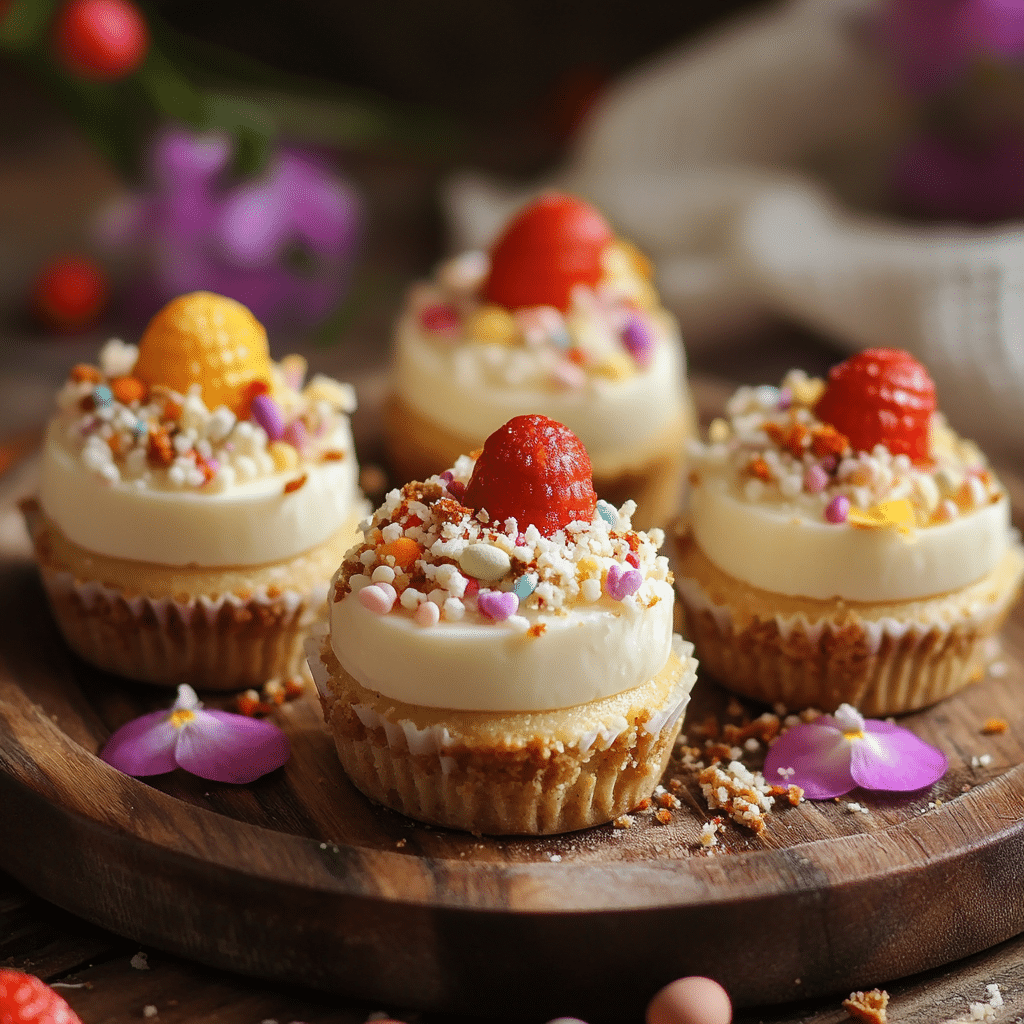
When spring arrives and Easter is around the corner, there’s no better time to whip up a dessert that’s as festive as it is delightful. These Easter No-Bake Mini Cheesecakes are everything you want in a springtime treat: colorful, creamy, easy to make, and full of joy. With a buttery shortbread crust and smooth, tangy cheesecake filling swirled in pastel hues, they’re as fun to look at as they are to eat.
The best part? There’s no oven required. This makes them a perfect option for warm-weather holidays or last-minute baking projects with kids. Made with full-fat cream cheese, whipped cream, and a hint of vanilla and lemon, the flavor is classic and comforting with a fresh twist. You simply layer the crust, mix and color the filling, chill, and decorate.
They’re ideal for Easter brunch, dessert tables, baby showers, or any spring celebration. The topping possibilities are endless—whipped cream, candy eggs, sprinkles—making each mini cheesecake unique and customizable. These little bites of cheer prove that you don’t need baking skills to create a dessert that’s both impressive and delicious.
Why You’ll Love This Recipe
- No Baking Needed – Perfect for warmer days or when the oven is already full.
- Stunning Pastel Colors – A festive, eye-catching dessert for Easter or spring gatherings.
- Make-Ahead Friendly – Prepare them in advance and chill until ready to serve.
- Kid-Friendly Activity – Great for little helpers who can color and decorate.
- Mini and Portable – Perfect portion sizes for parties, picnics, or gifts.

Ingredients
- Shortbread cookies
- Unsalted butter
- Cold water
- Unflavored powdered gelatin
- Cream cheese
- Granulated sugar
- Lemon juice
- Vanilla bean paste (or vanilla extract)
- Salt
- Heavy cream
- Gel food coloring (assorted pastel colors)
- Whipped cream (for decorating)
- Candy eggs (for decorating)
- Sprinkles (for decorating)
Variations
- Crust options – Use graham crackers, chocolate cookies, or gingersnaps instead of shortbread.
- Flavor it up – Add citrus zest (lemon or orange) for a brighter flavor.
- Vegan alternative – Use dairy-free cream cheese, whipped topping, and a plant-based gelatin substitute.
- Chocolate swirl – Add a cocoa-colored layer or chocolate chips for contrast.
- Change the theme – Swap Easter decorations for fresh berries or edible flowers for a general spring dessert.
How to Make the Recipe
Step 1: Make the Crust
Crush the shortbread cookies into fine crumbs and mix with melted butter. Press the mixture firmly into the bottoms of cupcake liners or a mini cheesecake pan. Chill to set.
Step 2: Bloom the Gelatin
In a small bowl, sprinkle the gelatin over cold water and let sit for 5 minutes to bloom.
Step 3: Make the Cheesecake Base
In a large mixing bowl, beat the cream cheese, sugar, lemon juice, vanilla bean paste, and a pinch of salt until smooth and fluffy.
Step 4: Melt the Gelatin
Gently heat the bloomed gelatin in the microwave or over a double boiler just until melted (do not boil), then mix it into the cheesecake base.
Step 5: Fold in the Cream
Whip the heavy cream to soft peaks and fold it gently into the cream cheese mixture until fully combined.
Step 6: Color the Filling
Divide the filling evenly into separate bowls and tint each with a different gel food coloring. Swirl or layer the colors into the prepared crusts.
Step 7: Chill
Refrigerate for at least 4 hours or until fully set.
Step 8: Decorate
Top each mini cheesecake with a dollop of whipped cream, candy eggs, and sprinkles.
Tips for Making the Recipe
- Use full-fat cream cheese at room temperature for the smoothest texture.
- Don’t skip blooming the gelatin—it ensures the cheesecake sets properly.
- For sharp, vibrant colors, use gel rather than liquid food coloring.
- Chill overnight if possible for best texture and flavor.
- Use a piping bag for neat whipped cream dollops.

How to Serve
Serve these mini cheesecakes:
- On a dessert platter with spring-themed garnishes
- Individually in cupcake liners for easy handling
- With tea or coffee for a light spring dessert
- As a fun Easter brunch or picnic treat
- In small boxes as edible Easter gifts
Make Ahead and Storage
Storing Leftovers
Keep covered in the refrigerator for up to 5 days. Store without decorations for best results.
Freezing
Freeze undecorated cheesecakes in an airtight container for up to 1 month. Thaw overnight in the fridge before serving.
Reheating
No reheating needed—these are served chilled!
FAQs
1. Can I make these cheesecakes without gelatin?
Yes, but they won’t be as firm. Use a whipped cream-based no-bake filling or a vegetarian alternative like agar-agar.
2. What’s the best way to crush the cookies?
Use a food processor or place them in a zip-top bag and crush with a rolling pin.
3. Can I use store-bought whipped cream?
Yes, but freshly whipped cream gives a better flavor and texture.
4. Do I need to use gel food coloring?
Gel coloring gives brighter colors without thinning the batter—liquid food coloring may not hold up as well.
5. Can I use a regular cheesecake pan?
Yes, but adjust the chill time and slice carefully before serving.
6. How do I make clean layers or swirls?
Use a spoon or piping bag to add each color carefully, then swirl gently with a skewer.
7. Can I skip the crust?
You can, though the crust adds great texture. You could also use a gluten-free base if needed.
8. Are these suitable for kids?
Absolutely—just supervise the gelatin and coloring steps.
9. Can I make these in silicone molds?
Yes, silicone molds work well and make unmolding easier.
10. How long do they need to chill?
At least 4 hours, but overnight chilling gives the best texture.
Conclusion
These Easter No-Bake Mini Cheesecakes are the ultimate spring treat—bright, creamy, and easy enough for anyone to make. With their pastel swirls, buttery crusts, and playful toppings, they bring cheer and charm to any table. Perfect for Easter and beyond, they’re a sweet celebration of the season. Whether you’re hosting brunch, looking for a kid-friendly dessert, or simply craving something pretty and indulgent, these cheesecakes are sure to deliver joy in every bite.
Print
Easter No-Bake Mini Cheesecakes
- Total Time: 4 hours (includes chilling)
- Yield: 12 mini cheesecakes
- Diet: Vegetarian
Description
These vibrant, pastel-layered mini cheesecakes are a delightful no-bake treat, perfect for celebrating Easter or spring gatherings. With a buttery shortbread crust, creamy lemon-vanilla filling, and colorful layers topped with whipped cream, candy eggs, and sprinkles, they’re as festive as they are delicious.
Ingredients
For the crust:
-
6 oz shortbread cookies (approximately 12 round cookies)
-
0.5 oz unsalted butter (1 tablespoon), melted
For the cheesecake filling:
-
1 lb full-fat cream cheese, at room temperature
-
3.5 oz granulated sugar (½ cup)
-
½ tsp lemon juice
-
1 tsp vanilla bean paste (or substitute with vanilla extract)
-
Pinch of salt
-
1 cup heavy cream, at room temperature
-
Assorted gel food coloring (4 colors recommended)
For decoration:
-
½ cup whipped cream
-
Candy eggs
-
Sprinkles
Instructions
-
Prepare the crust: In a food processor, pulse the shortbread cookies until finely ground. Combine the crumbs with melted butter until the mixture resembles wet sand. Press the mixture into the bottoms of mini cheesecake pans or silicone molds. Chill in the refrigerator while preparing the filling.
-
Make the filling: In a large mixing bowl, beat the cream cheese, sugar, lemon juice, vanilla bean paste, and salt until smooth and creamy.
-
Whip the cream: In a separate bowl, whip the heavy cream to stiff peaks. Gently fold the whipped cream into the cream cheese mixture until well combined.
-
Color the filling: Divide the filling evenly into four bowls. Add a few drops of different gel food coloring to each bowl and mix until desired colors are achieved.
-
Assemble the cheesecakes: Spoon or pipe the colored fillings into the prepared crusts, layering the colors as desired. Smooth the tops and refrigerate for at least 4 hours, or until set.
-
Decorate: Before serving, top each cheesecake with a dollop of whipped cream, candy eggs, and sprinkles.
Notes
Ensure all ingredients are at room temperature for a smoother filling.
Use gel food coloring for vibrant, non-diluted colors.
These cheesecakes can be prepared a day in advance and stored in the refrigerator
- Prep Time: 30 minutes
- Cook Time: None
- Category: Dessert
- Method: No-Bake
- Cuisine: American
Keywords: Easter mini cheesecakes, no-bake cheesecake, pastel desserts, spring desserts, holiday treats, cheesecake recipe