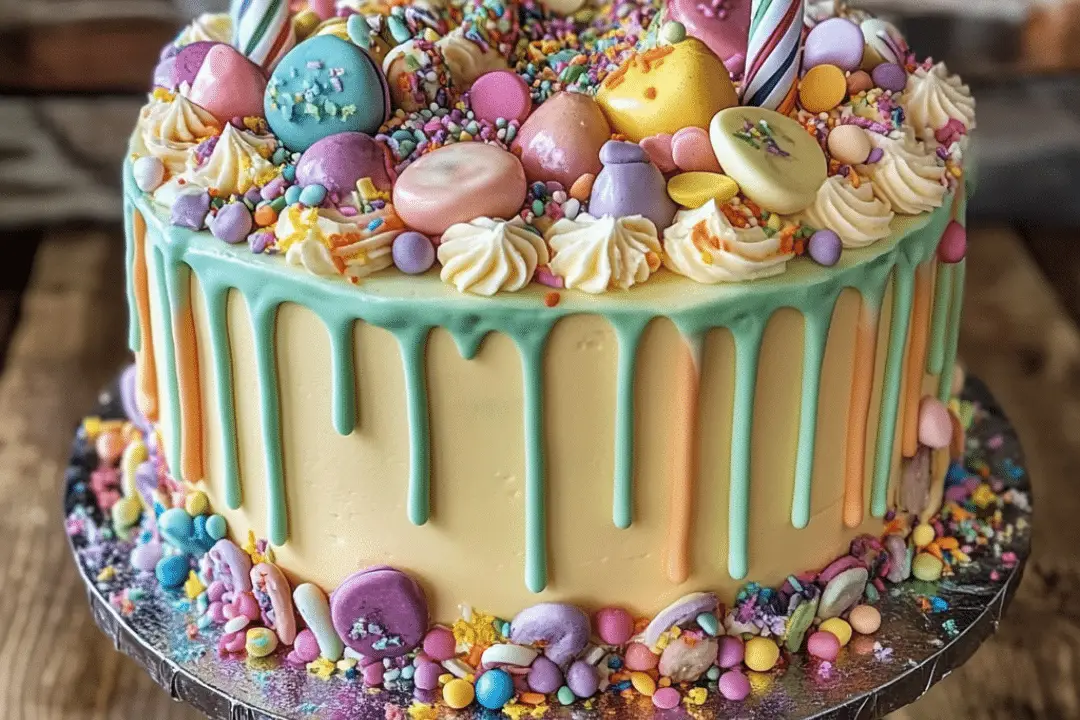
A Rainbow Drip Cake Magic is the perfect showstopper for any celebration. This whimsical, colorful cake is not only visually stunning but also deliciously irresistible. The layers of fluffy, buttery cake, combined with the vibrant rainbow colors, create a feast for the eyes as much as for the taste buds. Topped with a decadent white chocolate drip and adorned with sprinkles, this cake is a fun and festive treat for birthdays, parties, or any special occasion.
Baking this cake gives you the opportunity to get creative with colors, making it an excellent choice for themed events, and it’s easy to customize to your liking. Whether you’re an experienced baker or a beginner, this recipe is simple to follow and yields a gorgeous result. With a moist, rich crumb, creamy white chocolate ganache, and a playful splash of color, it’s sure to delight guests of all ages. A true showstopper, this Rainbow Drip Cake Magic is as fun to make as it is to enjoy.
Why You’ll Love This Recipe
This Rainbow Drip Cake is not only eye-catching but also filled with flavor. The cake itself is light and moist, thanks to the use of buttermilk, which adds a tangy richness that complements the sweetness of the frosting and ganache. The vibrant colors make it perfect for celebrations, while the white chocolate drip adds a touch of elegance and decadence. The sprinkle decoration adds a playful finishing touch that’s sure to bring joy to anyone who sees (and tastes) it.
Ingredients
- All-purpose flour
- Granulated sugar
- Baking powder
- Baking soda
- Salt
- Unsalted butter
- Eggs
- Buttermilk
- Vanilla extract
- Gel food coloring in various colors
- White chocolate chips
- Heavy cream
- Sprinkles for decoration
Variations
- Flavored Cake: You can add different flavor extracts like almond or lemon to infuse the cake with an extra burst of flavor.
- Different Drips: Instead of white chocolate, you can use milk or dark chocolate for the drip, or even a colored drip by mixing food coloring into the ganache.
- Frosting Variations: You can swap the frosting with a cream cheese frosting or whipped cream for a lighter alternative.
- Gluten-Free Option: Replace the all-purpose flour with a gluten-free flour blend for a gluten-free version of the cake.
How to Make the Recipe
Step 1: Preheat Oven and Prepare Pans
Preheat your oven to 350°F (175°C). Grease and flour two 9-inch round cake pans or line them with parchment paper for easy removal.
Step 2: Mix Dry Ingredients
In a large mixing bowl, whisk together the flour, baking powder, baking soda, and salt. Set aside.
Step 3: Cream Butter and Sugar
In a separate bowl, beat the softened butter and sugar together until light and fluffy, about 3-4 minutes. This step is essential for creating a light and airy cake.
Step 4: Add Eggs and Vanilla
Add the eggs, one at a time, beating well after each addition. Stir in the vanilla extract.
Step 5: Combine Wet and Dry Ingredients
Gradually add the dry ingredients to the wet mixture, alternating with the buttermilk. Start and end with the dry ingredients. Mix until just combined, but be careful not to overmix.
Step 6: Color the Cake Batter
Divide the batter evenly into separate bowls, depending on how many colors you want for your rainbow layers. Add a few drops of gel food coloring to each bowl and stir until you reach the desired color intensity.
Step 7: Bake the Cake Layers
Spoon each color of batter into the prepared pans, creating distinct layers of color. Use a spoon or spatula to smooth out the top. Bake for 25-30 minutes or until a toothpick inserted into the center comes out clean.
Step 8: Prepare the White Chocolate Ganache
In a small saucepan, heat the heavy cream over medium heat until it begins to simmer. Remove from heat and add the white chocolate chips, stirring until smooth. Let it cool slightly before drizzling it over the cooled cake.
Step 9: Assemble the Cake
Once the cakes are completely cooled, place one layer on a serving plate. Spread a layer of frosting over the top, then add the second cake layer. Frost the entire cake with your desired frosting.
Step 10: Add the Drip
Spoon the white chocolate ganache over the edge of the cake, letting it drip down the sides. For a more dramatic effect, let the ganache cool a little more to thicken before applying.
Step 11: Decorate
Top with colorful sprinkles for the finishing touch. Let the cake sit for a few minutes to allow the ganache to set before serving.
Tips for Making the Recipe
- Use Gel Food Coloring: Gel food coloring provides more vibrant colors than liquid food coloring, making it ideal for this cake.
- Room Temperature Ingredients: Ensure that your butter, eggs, and buttermilk are at room temperature to help the cake batter come together smoothly.
- Don’t Overmix: Mix the batter until just combined to avoid a dense cake.
- Allow the Cake to Cool Completely: This will prevent the frosting and ganache from melting when applied.
- Drip Consistency: If your ganache is too runny, let it cool slightly before applying it to ensure it drips properly.
How to Serve
Serve this Rainbow Drip Cake Magic as a dessert for any special occasion or celebration. It pairs beautifully with a hot cup of coffee or a chilled glass of milk. To make the presentation even more fun, cut the cake in front of guests to reveal the colorful layers inside.
Make Ahead and Storage
Storing Leftovers
Store any leftover cake in an airtight container at room temperature for up to 3 days. The cake is best enjoyed fresh but will stay moist for a few days.
Freezing
If you want to freeze the cake, wrap each layer tightly in plastic wrap and aluminum foil, then place it in a freezer-safe bag. You can freeze the layers for up to 3 months. Thaw the cake overnight in the refrigerator before assembling.
Reheating
While this cake is best served at room temperature, you can gently warm individual slices in the microwave for a few seconds if you prefer it slightly warm.
FAQs
1. Can I make this cake in advance?
Yes, you can bake the cake layers in advance and store them in the refrigerator for up to 3 days before assembling and decorating.
2. Can I use a different type of frosting?
Yes, feel free to use buttercream, cream cheese frosting, or whipped cream as an alternative to the frosting in this recipe.
3. What if my ganache isn’t thick enough for the drip?
If your ganache is too thin, let it cool for a few minutes to thicken up before drizzling it over the cake.
4. How do I get vibrant colors for the cake layers?
Use gel food coloring for the most vibrant and intense colors. Start with a few drops and add more if necessary until you achieve the desired shade.
5. Can I use a different type of chocolate for the drip?
Yes, you can substitute white chocolate with milk or dark chocolate, or even use colored ganache for a fun twist.
6. Can I make this cake gluten-free?
Yes, substitute the all-purpose flour with a gluten-free flour blend to make this cake gluten-free.
7. How do I prevent the cake from sinking in the middle?
Make sure to properly measure the ingredients, and avoid overmixing the batter, which can cause the cake to collapse.
8. Can I add different decorations to the cake?
Absolutely! You can add more sprinkles, edible glitter, or even candy for an extra fun touch.
9. Can I make this cake with a different flavor?
Yes, you can easily change the flavor by using different extracts, like almond, lemon, or orange, or by adding cocoa powder to the batter.
10. How long will the cake last?
The cake will last for up to 3 days if stored properly in an airtight container at room temperature.
Conclusion
This Rainbow Drip Cake Magic is a vibrant, delicious, and fun way to celebrate any special occasion. With its colorful layers, creamy ganache drip, and playful sprinkles, it’s sure to wow your guests. Not only is it visually stunning, but it’s also a treat for the taste buds with its moist cake and smooth frosting. Whether you’re hosting a birthday, a party, or just want to make a memorable dessert, this cake will steal the show!
Print
Rainbow Drip Cake Magic
- Total Time: 1 hour (including cooling time)
- Yield: 12–16 slices 1x
Description
This vibrant and colorful cake features rainbow layers and a luscious white chocolate drip, creating a visually stunning treat that’s as delicious as it is beautiful. Perfect for celebrations or any special occasion!
Ingredients
For the Cake:
- 2 cups all-purpose flour
- 1 1/2 cups granulated sugar
- 1 teaspoon baking powder
- 1/2 teaspoon baking soda
- 1/2 teaspoon salt
- 3/4 cup unsalted butter, softened
- 3 large eggs
- 1 cup buttermilk
- 1 teaspoon vanilla extract
- Gel food coloring in various colors
For the White Chocolate Drip:
- 1 cup white chocolate chips
- 1/2 cup heavy cream
For Decoration:
- Sprinkles for decoration
Instructions
- Prepare the Cake:
- Preheat the oven to 350°F (175°C). Grease and flour 3 round cake pans.
- In a large bowl, combine flour, sugar, baking powder, baking soda, and salt.
- Add softened butter and mix until the mixture resembles fine crumbs.
- Add eggs, buttermilk, and vanilla extract. Mix until smooth.
- Divide the batter into separate bowls and add different colors of gel food coloring to each bowl, mixing to create vibrant layers.
- Pour each colored batter into a separate cake pan and smooth the tops.
- Bake for 25-30 minutes, or until a toothpick inserted in the center comes out clean.
- Let cakes cool completely in the pans, then remove and set aside.
- Prepare the White Chocolate Drip:
- In a microwave-safe bowl, combine white chocolate chips and heavy cream.
- Microwave in 20-second intervals, stirring in between, until the chocolate is melted and smooth.
- Assemble the Cake:
- Place the first layer of the cake on a cake stand or serving plate. Spread a layer of frosting (you can use buttercream or cream cheese frosting).
- Add the second layer and repeat the frosting step.
- Add the third layer on top and smooth the frosting around the entire cake.
- Carefully pour the white chocolate ganache over the top of the cake, allowing it to drip down the sides.
- Decorate the top with sprinkles and any additional decorations you prefer.
- Serve:
- Allow the cake to set for a few minutes, then slice and serve to your guests!
Notes
- To create the colorful layers, you can adjust the amount of food coloring based on how vibrant you want each layer to be.
- If you don’t have buttermilk, you can substitute it with regular milk and add 1 tablespoon of white vinegar or lemon juice.
- You can also use different types of frosting or fillings between the layers if preferred.
- Prep Time: 20 minutes
- Cook Time: 25-30 minutes