
Red velvet cake is one of those timeless desserts that never goes out of style. Its rich color, soft texture, and delicate flavor have made it a staple for special occasions, whether it’s for a birthday, holiday, or just a sweet indulgence. This cake’s unique flavor profile comes from the balance between the subtle cocoa taste and the tanginess from the buttermilk and vinegar, all complemented by the creaminess of the frosting. With its vibrant red hue and smooth frosting, red velvet cake is as visually striking as it is delicious. The moist layers of cake paired with creamy frosting create a perfect harmony of textures and flavors that anyone can enjoy.
The beauty of this red velvet cake lies in its simplicity. While the recipe calls for a few key ingredients, the results are nothing short of spectacular. It’s a crowd-pleaser at parties, weddings, and gatherings, and it’s easy to see why. So if you’re looking for a cake that’s not only delicious but also impressive to serve, red velvet cake is the answer.
Why You’ll Love This Recipe
1. Moist and Tender Texture
Red velvet cake is known for its incredibly moist and soft texture. Thanks to the oil and buttermilk, each bite is velvety smooth and melts in your mouth.
2. Unique Flavor
With a hint of cocoa and tanginess from the buttermilk and vinegar, the flavor is light yet rich, making it stand out from other cakes.
3. Visually Stunning
The bright red color of the cake makes it an eye-catching dessert that’s sure to impress guests and create a festive atmosphere.
4. Perfect for Special Occasions
Whether it’s a birthday, holiday, or just a weekend treat, red velvet cake adds a touch of elegance and indulgence to any celebration.
5. Easy to Make
With just a few simple ingredients and clear steps, this cake is easy to whip up. It’s perfect for both beginner and experienced bakers alike.
Ingredients
- All-purpose flour
- Granulated sugar
- Baking soda
- Salt
- Cocoa powder
- Vegetable oil
- Buttermilk (room temperature)
- Eggs (room temperature)
- Red food coloring
- White distilled vinegar
- Vanilla extract
Variations
While the classic red velvet cake is already delicious, there are a few fun ways you can change it up:
1. Cream Cheese Frosting
Instead of traditional buttercream, use cream cheese frosting for a tangy contrast to the sweetness of the cake.
2. Cupcakes
Turn this cake into cupcakes by baking the batter in a muffin tin. This makes for a cute and portable version of the classic.
3. Chocolate Red Velvet
Increase the cocoa powder slightly for a deeper chocolate flavor while maintaining the traditional red velvet taste.
4. Layer Cake
Stack multiple layers of cake with frosting in between for a multi-layered masterpiece.
How to Make the Recipe
Step 1: Preheat the Oven
Preheat your oven to 350°F (175°C) and grease and flour two 9-inch round cake pans.
Step 2: Mix the Dry Ingredients
In a medium-sized bowl, whisk together the flour, cocoa powder, baking soda, and salt. Set aside.
Step 3: Mix Wet Ingredients
In a large bowl, whisk together the vegetable oil, sugar, eggs, buttermilk, vanilla extract, and vinegar. Add the red food coloring and mix until everything is well combined.
Step 4: Combine Wet and Dry Ingredients
Gradually add the dry ingredients to the wet mixture and mix until smooth. Be careful not to overmix.
Step 5: Bake the Cake
Divide the batter evenly between the prepared cake pans and bake for 25-30 minutes, or until a toothpick inserted into the center comes out clean.
Step 6: Cool the Cake
Allow the cakes to cool in the pans for 10 minutes before transferring them to wire racks to cool completely.
Step 7: Frost the Cake
Once the cake has cooled, frost with your choice of frosting (buttercream or cream cheese). Spread the frosting evenly over the cake layers and top with any desired decorations.
Tips for Making the Recipe
1. Room Temperature Ingredients
Ensure your eggs and buttermilk are at room temperature before mixing. This helps create a smoother batter and ensures even baking.
2. Don’t Overmix
Overmixing the batter can result in a dense cake. Mix until just combined for the best texture.
3. Use Gel Food Coloring
Gel food coloring is recommended for vibrant color without adding extra liquid to the batter.
4. Don’t Overbake
Check the cake a few minutes before the timer goes off. Overbaking can cause the cake to dry out.
5. Frosting Variations
Try using cream cheese frosting for a tangy twist or add chocolate ganache for a richer flavor.
How to Serve
Red velvet cake is best served slightly chilled or at room temperature. It’s a great dessert to pair with a cup of coffee or tea. For a festive presentation, garnish with fresh berries or edible flowers, or add sprinkles for extra color.
Make Ahead and Storage
Storing Leftovers
Store leftover red velvet cake in an airtight container at room temperature for up to 3 days. If the weather is hot or humid, keep it in the refrigerator.
Freezing
You can freeze red velvet cake for up to 2-3 months. Wrap the cake layers tightly in plastic wrap and aluminum foil before placing them in a freezer-safe bag.
Reheating
To reheat a frozen cake, allow it to thaw in the fridge overnight and bring it to room temperature before serving.
FAQs
1. Can I use all-purpose flour instead of cake flour?
Yes, all-purpose flour works well, though cake flour might create an even lighter cake.
2. Can I make this cake without food coloring?
Yes, you can omit the food coloring, though the classic red color is a key part of the red velvet cake’s identity.
3. Can I use non-dairy milk instead of buttermilk?
You can use almond milk or another non-dairy milk, but the tangy flavor of buttermilk contributes to the unique taste of red velvet cake.
4. How can I make this cake gluten-free?
Substitute the all-purpose flour with a gluten-free flour blend. Make sure to check the proportions, as some gluten-free blends require additional ingredients like xanthan gum.
5. Can I make this recipe in a different pan size?
Yes, you can use square, rectangular, or muffin pans, but make sure to adjust the baking time accordingly.
6. How do I make the frosting?
For a classic buttercream, beat butter, powdered sugar, vanilla, and a bit of cream. For cream cheese frosting, mix cream cheese and butter with powdered sugar.
7. How do I prevent my cake from sticking to the pan?
Grease and flour your pans thoroughly or use parchment paper circles to line the bottoms of the pans.
8. Can I use a box cake mix for this recipe?
Yes, you can, but homemade batter typically yields a better flavor and texture.
9. How can I make my red velvet cake more moist?
Adding extra oil or using sour cream in the batter can help make the cake even more moist.
10. Can I use the recipe for cupcakes?
Yes, the recipe can easily be adapted for cupcakes. Bake for 18-20 minutes instead of 25-30 minutes.
Conclusion
Red velvet cake is the perfect dessert for any occasion, offering a unique flavor and striking appearance. With simple ingredients and easy steps, this cake can be made at home with great success. Whether you’re baking for a celebration or just treating yourself, red velvet cake never disappoints. So, gather your ingredients, get baking, and enjoy a slice of this classic beauty!
Print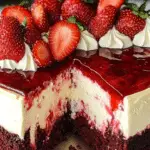
Red Velvet Cake: A Classic Favorite
- Total Time: 50 minutes
- Yield: 12 servings 1x
Description
This classic Red Velvet Cake is a rich, moist cake with a subtle cocoa flavor, vibrant red color, and smooth cream cheese frosting. Perfect for any special occasion, it’s a showstopper that’s as delicious as it is beautiful.
Ingredients
- 2 1/2 cups all-purpose flour
- 1 1/2 cups granulated sugar
- 1 teaspoon baking soda
- 1 teaspoon salt
- 1 teaspoon cocoa powder
- 1 1/2 cups vegetable oil
- 1 cup buttermilk, room temperature
- 2 large eggs, room temperature
- 2 tablespoons red food coloring
- 1 teaspoon white distilled vinegar
- 1 teaspoon vanilla extract
Instructions
- Preheat your oven to 350°F (175°C) and grease and flour two 9-inch round cake pans.
- In a large bowl, sift together the flour, sugar, baking soda, salt, and cocoa powder.
- In another bowl, whisk together the vegetable oil, buttermilk, eggs, red food coloring, vinegar, and vanilla extract until smooth.
- Gradually add the wet ingredients to the dry ingredients and mix until fully combined.
- Divide the batter evenly between the prepared cake pans.
- Bake in the preheated oven for 25-30 minutes, or until a toothpick inserted into the center of the cakes comes out clean.
- Let the cakes cool in the pans for 10 minutes before transferring to a wire rack to cool completely.
- Once cooled, frost with your favorite cream cheese frosting and serve.
Notes
- If you don’t have buttermilk, you can make your own by adding 1 tablespoon of vinegar or lemon juice to 1 cup of milk and letting it sit for 5 minutes.
- For a stronger red color, you can increase the amount of food coloring used, but two tablespoons is typically sufficient for a deep red hue.
- Prep Time: 20 minutes
- Cook Time: 30 minutes