Introduction:
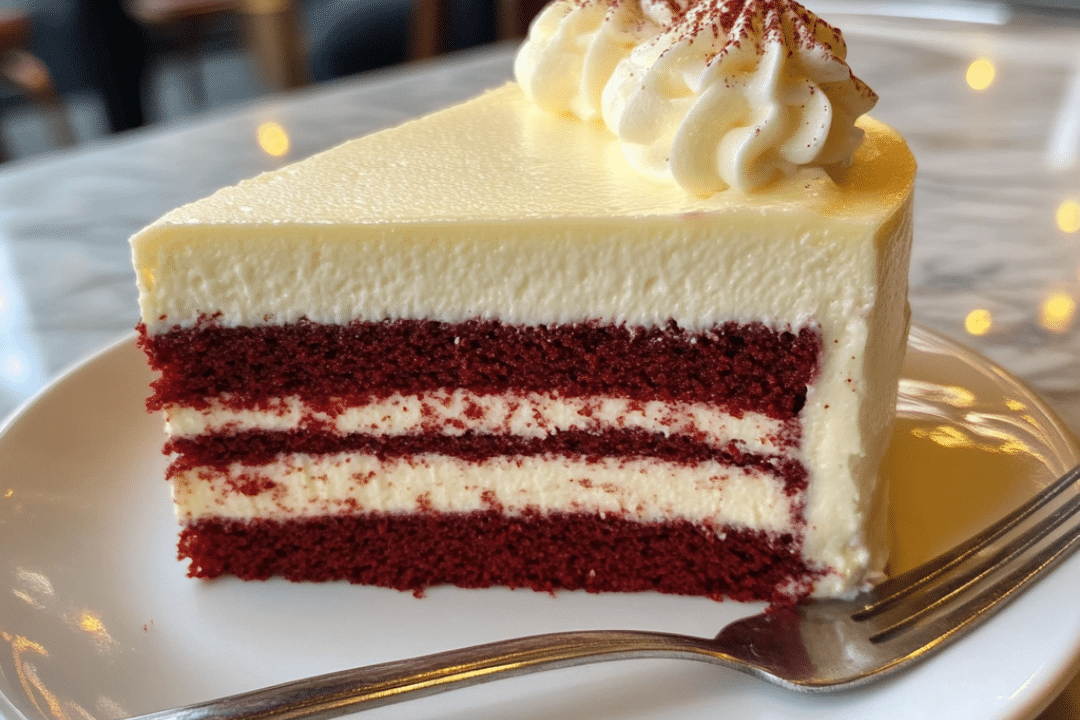
Red Velvet Cheesecake combines the decadence of a creamy cheesecake with the iconic flavor and vibrant color of red velvet cake. With a chocolate cookie crust and a rich, smooth cheesecake filling, it offers a perfect balance of flavors and textures. The subtle tang of the cream cheese and sour cream complement the sweetness of the red velvet, creating an unforgettable dessert that’s ideal for special occasions like holidays, birthdays, or a festive gathering. This recipe’s stunning red color and creamy texture make it not only delicious but also an eye-catching centerpiece for any dessert table.
Why You’ll Love This Recipe:
This Red Velvet Cheesecake has the best of both worlds: the indulgence of cheesecake with the rich flavor of red velvet. The combination of the creamy filling and slightly tangy sour cream balances out the sweetness of the red velvet, while the chocolate cookie crust adds a wonderful crunch. Plus, its vibrant red color makes it perfect for celebrating any occasion, from Valentine’s Day to Christmas or even a wedding. Whether you’re a cheesecake lover or a red velvet enthusiast, this dessert will surely impress your guests and leave them asking for seconds.
Ingredients:
- 1 1/2 cups chocolate cookie crumbs
- 1/4 cup butter, melted
- 3 (8 ounce) packages cream cheese, softened
- 1 1/2 cups white sugar
- 4 large eggs
- 1 cup sour cream
- 1/2 cup buttermilk
- 2 teaspoons vanilla extract
- 1 teaspoon white vinegar
- 2 (1 ounce) bottles red food coloring
- 1/4 cup all-purpose flour
Variations:
- Toppings: Add whipped cream, fresh berries, or a drizzle of chocolate sauce on top of the cheesecake for added texture and flavor.
- Crust: If you prefer a different crust, try using graham cracker crumbs or even crushed pretzels for a sweet-salty contrast.
- Flavor Twist: You can add a hint of cocoa powder to the cheesecake batter for a deeper chocolate flavor to complement the red velvet.
- Gluten-Free Option: Use gluten-free chocolate cookies or a gluten-free crust base if needed.
How to Make the Recipe:
Step 1: Prepare the Crust
- Preheat your oven to 325°F (165°C) and grease the bottom and sides of a 9-inch springform pan.
- In a bowl, combine the chocolate cookie crumbs and melted butter, stirring until the crumbs are evenly coated with butter.
- Press the mixture into the bottom of the prepared springform pan to form an even crust. Use the back of a spoon to press it down firmly.
Step 2: Make the Cheesecake Batter
- In a large mixing bowl, beat the cream cheese and sugar together using an electric mixer until smooth and creamy.
- Add the eggs, one at a time, beating well after each addition.
- Fold in the sour cream, buttermilk, vanilla extract, and vinegar. Mix until well combined.
- Add the red food coloring, starting with one bottle and mixing well. If you want a deeper red color, add the second bottle of food coloring. Mix until the color is evenly distributed.
- Finally, add the flour and mix until smooth.
Step 3: Assemble and Bake
- Pour the cheesecake batter over the prepared crust in the springform pan, smoothing out the top.
- Bake the cheesecake in the preheated oven for about 1 hour and 10 minutes. The edges should be set, but the center should still be slightly jiggly.
- Turn off the oven and let the cheesecake cool inside the oven with the door slightly open for 1 hour. This will help prevent cracking.
Step 4: Chill the Cheesecake
- After the cheesecake has cooled for an hour, remove it from the oven and refrigerate for at least 4 hours, or until completely chilled and set.
Step 5: Serve and Enjoy
Once the cheesecake is fully chilled, carefully remove it from the springform pan. Serve slices as-is, or garnish with whipped cream, fresh berries, or chocolate drizzle for an extra touch of sweetness.
Tips for Making the Recipe:
- Room Temperature Ingredients: Make sure the cream cheese is softened to room temperature before mixing. This ensures a smooth batter without lumps.
- Avoid Overmixing: Be careful not to overmix the batter once the eggs are added. Overmixing can cause the cheesecake to crack as it bakes.
- Prevent Cracking: Let the cheesecake cool slowly in the oven and refrigerate it before cutting to help prevent cracks on the surface.
- Food Coloring: Use gel or concentrated liquid food coloring for a more vibrant red hue, as it tends to work better than traditional liquid food coloring.
How to Serve:
Serve this Red Velvet Cheesecake chilled, straight from the refrigerator. It pairs wonderfully with a dollop of whipped cream, some fresh berries like raspberries or strawberries, or even a drizzle of chocolate ganache. For an extra touch, you can also sprinkle a little powdered sugar on top before serving.
Make-Ahead and Storage:
- Storing Leftovers: Leftover cheesecake can be stored in an airtight container in the refrigerator for up to 5 days.
- Freezing: To freeze, allow the cheesecake to cool completely, then wrap it tightly in plastic wrap and foil. It can be frozen for up to 2-3 months. To thaw, place the cheesecake in the refrigerator overnight before serving.
FAQs:
1. Can I use a different type of food coloring?
Yes, you can use any type of food coloring, but gel or concentrated liquid food coloring works best for a vibrant red color.
2. How can I tell if my cheesecake is done?
The edges should be set, but the center should still be slightly jiggly. Once it cools, it will firm up.
3. Can I use a different crust for this cheesecake?
Yes, you can use graham cracker crumbs or even a nut-based crust like almonds or pecans for a different flavor.
4. Can I make this cheesecake ahead of time?
Yes, this cheesecake needs to chill for at least 4 hours (preferably overnight), so it’s perfect to make ahead of time.
5. Can I double this recipe?
You can double the recipe, but be sure to adjust the baking time accordingly. You may need to use a larger pan and bake for a bit longer.
Conclusion:
This Red Velvet Cheesecake is a show-stopping dessert that combines the best elements of cheesecake and red velvet cake. Its creamy texture, bold red color, and deliciously smooth flavor will make it a crowd-pleaser at any event. Whether you’re celebrating a special occasion or just want to treat yourself, this cheesecake is sure to impress with every bite.
Print
Red Velvet Cheesecake
- Total Time: 5 hours
- Yield: 12 servings 1x
Description
A luscious blend of creamy cheesecake and the rich, vibrant flavor of red velvet, this dessert features a chocolate cookie crust, a smooth, tangy filling, and the perfect hint of red color. Ideal for special occasions or when you want to impress with a decadent treat!
Ingredients
- 1 1/2 cups chocolate cookie crumbs
- 1/4 cup butter, melted
- 3 (8 ounce) packages cream cheese, softened
- 1 1/2 cups white sugar
- 4 large eggs
- 1 cup sour cream
- 1/2 cup buttermilk
- 2 teaspoons vanilla extract
- 1 teaspoon white vinegar
- 2 (1 ounce) bottles red food coloring
- 1/4 cup all-purpose flour
Instructions
- Preheat oven to 325°F (165°C). Grease the bottom and sides of a 9-inch springform pan.
- In a bowl, mix chocolate cookie crumbs and melted butter until evenly combined. Press mixture into the bottom of the prepared springform pan to form the crust.
- Beat cream cheese and sugar together in a large bowl with an electric mixer until smooth. Add eggs one at a time, beating well after each addition.
- Fold in sour cream, buttermilk, vanilla extract, vinegar, and food coloring. Stir in flour and mix until smooth.
- Pour the batter over the crust in the springform pan.
- Bake for about 1 hour and 10 minutes, or until the edges are set and the center is slightly jiggly.
- Turn off the oven and let the cheesecake cool inside for 1 hour.
- Refrigerate until completely chilled, at least 4 hours, before serving.
Notes
- For best results, let the cheesecake chill overnight for the perfect texture.
- You can use a store-bought chocolate cookie crust instead of making your own if you’re short on time.
- Ensure the cheesecake is fully cooled before slicing to avoid cracks in the surface.
- Garnish with whipped cream or fresh berries for extra flair.
- Prep Time: 20 minutes
- Cook Time: 1 hour 10 minutes

