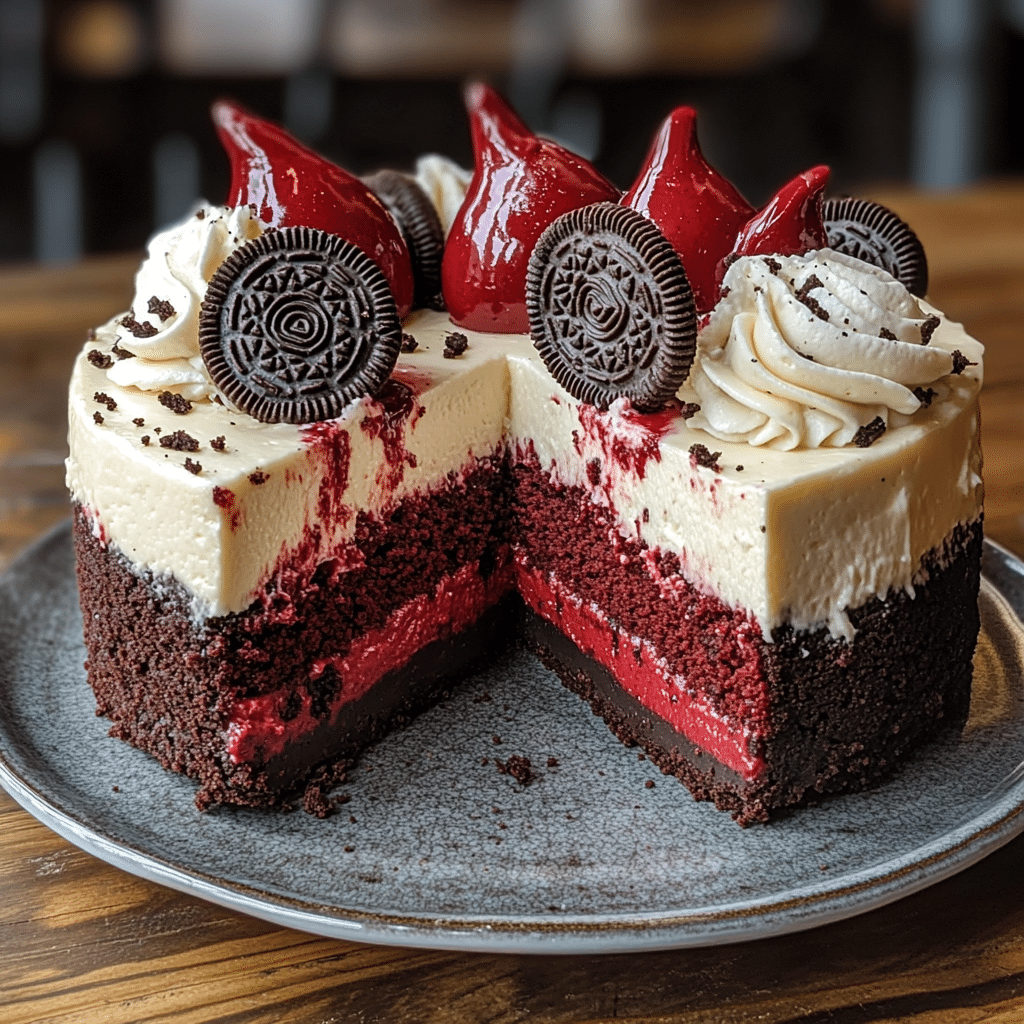
If you’re looking for a dessert that’s guaranteed to impress, look no further than The Best Red Velvet Oreo Cheesecake. This indulgent treat combines the beloved flavors of red velvet cake with the creamy, rich texture of cheesecake, all sitting on top of a crispy, chocolatey Oreo crust. With its stunning red color, smooth cheesecake filling, and satisfying Oreo crunch, this dessert is both visually striking and utterly delicious.
Whether you’re hosting a special occasion, celebrating a milestone, or simply treating yourself to something indulgent, this red velvet Oreo cheesecake is a true showstopper. The blend of flavors and textures makes it perfect for any gathering or a special evening at home. Plus, it’s surprisingly easy to make, allowing you to spend more time enjoying the reactions from your guests and less time in the kitchen.
Why You’ll Love This Recipe
1. A Showstopping Dessert
The vibrant red velvet layers and creamy cheesecake filling make this cheesecake a true centerpiece, ideal for any celebration.
2. Perfect Combination of Flavors
The subtle cocoa flavor of the red velvet, paired with the richness of the cheesecake and the crunch of the Oreo crust, makes every bite a delightful experience.
3. Easy to Make
Despite its stunning appearance, this cheesecake is surprisingly easy to make and doesn’t require any advanced baking skills.
4. Versatile Dessert
You can serve it at various occasions, from birthdays and holidays to casual get-togethers or dinner parties. It’s a dessert that fits almost any celebration.
5. Make-Ahead Friendly
The cheesecake can be made in advance and stored in the refrigerator, making it a great choice for busy hosts or those who like to prepare ahead of time.

Ingredients
For the Oreo crust:
- Oreo cookies (crushed)
- Butter (melted)
For the red velvet cake:
- All-purpose flour
- Cocoa powder
- Baking soda
- Salt
- Butter (softened)
- Sugar
- Eggs
- Buttermilk
- Red food coloring
- Vanilla extract
- White vinegar
For the cheesecake filling:
- Cream cheese (softened)
- Granulated sugar
- Sour cream
- Eggs
- Vanilla extract
- Heavy cream
Variations
- Chocolate Ganache Drizzle: Add a drizzle of rich chocolate ganache over the top for an extra indulgent finish.
- Mini Cheesecakes: Make individual-sized mini cheesecakes using muffin tins or mini springform pans, perfect for parties or as single servings.
- Fruit Compote: Serve the cheesecake with a berry compote (raspberry or strawberry) for a fresh and tangy contrast to the rich and creamy flavors.
- Oreo Flavor Twist: If you want even more Oreo flavor, you can crumble some additional Oreos on top of the cheesecake before serving.
How to Make the Recipe
Step 1: Prepare the Oreo Crust
Preheat your oven to 325°F (163°C). In a food processor, pulse the Oreo cookies until they are finely crushed. In a mixing bowl, combine the crushed cookies with melted butter and stir until evenly combined. Press this mixture firmly into the bottom of a greased 9-inch springform pan. Bake for about 10 minutes, then remove the crust from the oven and set it aside to cool.
Step 2: Make the Red Velvet Cake
In a medium-sized bowl, whisk together the flour, cocoa powder, baking soda, and salt. In a separate large mixing bowl, cream together the softened butter and sugar until light and fluffy. Add the eggs, one at a time, followed by the buttermilk, red food coloring, vanilla extract, and vinegar. Mix until everything is combined. Gradually add the dry ingredients to the wet mixture, mixing until smooth. Pour the red velvet batter into the springform pan over the cooled Oreo crust, spreading it evenly.
Step 3: Make the Cheesecake Filling
In a large bowl, beat the softened cream cheese and granulated sugar until smooth and creamy. Add the sour cream, eggs, and vanilla extract, and continue to beat until fully combined. Add the heavy cream and mix until smooth.
Step 4: Assemble the Cheesecake
Carefully pour the cheesecake mixture over the red velvet cake layer in the springform pan. Smooth the top with a spatula. Place the pan into a larger roasting pan and add hot water to the roasting pan, about an inch deep, to create a water bath. Bake at 325°F (163°C) for 1 hour and 15 minutes, or until the edges are set but the center is still slightly jiggly.
Step 5: Cool the Cheesecake
Once the cheesecake is done, turn off the oven and leave the cheesecake in the oven with the door slightly ajar for 1 hour to cool gradually. Afterward, remove the cheesecake from the water bath and allow it to cool completely at room temperature. Refrigerate for at least 4 hours or preferably overnight to allow it to fully set.
Step 6: Serve and Enjoy
After chilling, remove the cheesecake from the springform pan and slice it. Serve it as is or top it with whipped cream, additional crushed Oreos, or a berry compote for extra flair.
Tips for Making the Recipe
- Use Room Temperature Ingredients: Ensure your cream cheese, eggs, and sour cream are at room temperature before mixing for a smooth, lump-free filling.
- Prevent Cracks: To prevent cracks in the cheesecake, don’t overmix the filling, and bake it slowly with the water bath.
- Don’t Overbake: The cheesecake is done when the edges are set and the center is slightly jiggly. It will firm up as it cools.
- Chill Properly: Let the cheesecake cool in the oven with the door slightly ajar to avoid sudden temperature changes that could cause cracks.
- Use Quality Oreo Cookies: For the best crust, make sure to use original Oreo cookies and not any flavored or special edition varieties.

How to Serve
Serve this stunning cheesecake as the centerpiece of your dessert table, alongside a variety of other sweet treats. It’s perfect for a birthday, holiday gathering, or even a casual dinner party. You can dress it up with fresh fruit, whipped cream, or a drizzle of chocolate sauce to make it even more appealing. It pairs wonderfully with a hot cup of coffee or a glass of dessert wine.
Make Ahead and Storage
Storing Leftovers
Store leftover cheesecake in an airtight container in the refrigerator for up to 4 days. Ensure it’s well-covered to prevent it from absorbing any odors in the fridge.
Freezing
This cheesecake can be frozen for up to 3 months. To freeze, slice the cheesecake and wrap each piece tightly in plastic wrap and aluminum foil. When ready to serve, thaw in the refrigerator overnight.
Reheating
Cheesecake is best served chilled, so there’s no need to reheat it. Simply slice and enjoy directly from the refrigerator.
FAQs
1. Can I make this cheesecake without the Oreo crust?
Yes, you can substitute the Oreo crust with a traditional graham cracker crust or a gluten-free crust option.
2. Can I use a cake mix for the red velvet layer?
Yes, you can use a store-bought red velvet cake mix to save time, but the homemade version adds more flavor and depth.
3. How do I know when the cheesecake is done?
The cheesecake is done when the edges are set, but the center is still slightly jiggly. It will firm up as it cools.
4. Can I make this cheesecake in a different pan size?
Yes, you can use a larger or smaller pan, but adjust the baking time accordingly. A 10-inch pan will need less time, while a smaller pan may need extra time.
5. Can I make this cheesecake without a water bath?
While a water bath helps ensure a smooth and crack-free cheesecake, you can skip it if you’re careful with baking time. Just bake at a lower temperature to avoid cracks.
6. How long should I let the cheesecake cool?
Allow the cheesecake to cool in the oven for 1 hour with the door slightly ajar, then chill it in the refrigerator for at least 4 hours or overnight.
7. Can I freeze this cheesecake?
Yes, you can freeze the cheesecake for up to 3 months. Just wrap it tightly in plastic wrap and foil.
8. What can I use to garnish the cheesecake?
You can garnish the cheesecake with whipped cream, fresh berries, chocolate ganache, or crushed Oreos for extra flavor and texture.
9. How do I avoid cracks in my cheesecake?
To avoid cracks, don’t overmix the batter and ensure a slow, gradual cooling process. A water bath can also help.
10. How can I make mini versions of this cheesecake?
You can make mini cheesecakes by using muffin tins or mini springform pans. Adjust the baking time for smaller portions.

Conclusion
The Best Red Velvet Oreo Cheesecake is the ultimate dessert to impress your guests and satisfy your sweet tooth. With its indulgent layers of red velvet cake, creamy cheesecake filling, and crunchy Oreo crust, this cheesecake is a treat for both the eyes and the taste buds. Whether you’re celebrating a special occasion or just want to enjoy a luxurious dessert, this cheesecake will not disappoint. So go ahead and make this stunning dessert for your next gathering—everyone will be asking for the recipe!
Print
The Best Red Velvet Oreo Cheesecake
- Total Time: 5 hours (including cooling and chilling)
- Yield: 12 servings 1x
Description
This Red Velvet Oreo Cheesecake is a show-stopping dessert that combines the tangy richness of cheesecake with the irresistible flavors of red velvet and Oreo cookies. With a creamy, velvety texture and a decadent crust, it’s the perfect dessert for any occasion, from birthdays to holiday celebrations.
Ingredients
For the Crust:
- 20 Oreo Cookies (crushed)
- 1/4 cup Unsalted Butter, melted
For the Cheesecake Filling:
- 3 (8 oz) packages Cream Cheese, softened
- 1 cup Granulated Sugar
- 1 tsp Vanilla Extract
- 3 large Eggs
- 1/2 cup Sour Cream
- 1/2 cup Heavy Cream
- 2 tbsp All-Purpose Flour
- 1 tbsp Cocoa Powder
- 1/2 cup Red Velvet Cake Mix (dry)
- 1/2 tsp Red Gel Food Coloring (optional, for a brighter red color)
For the Topping:
- 6–8 Oreo Cookies, crumbled (optional)
- Whipped Cream (optional, for garnish)
Instructions
- Preheat the oven to 325°F (163°C). Grease and line the bottom of a 9-inch springform pan with parchment paper.
- For the crust: Place the Oreo cookies in a food processor and pulse until finely crushed. Add the melted butter and pulse again until combined. Press the mixture into the bottom of the prepared pan to form a firm crust. Bake for 10 minutes, then remove from the oven and set aside to cool.
- For the cheesecake filling: In a large mixing bowl, beat the softened cream cheese until smooth and creamy. Add the sugar and vanilla extract, beating until well combined.
- Add the eggs one at a time, beating well after each addition. Then add the sour cream, heavy cream, flour, cocoa powder, and red velvet cake mix, and beat until smooth.
- Add the red gel food coloring (if using) to achieve the desired red color. Mix until evenly combined.
- Pour the cheesecake filling over the prepared crust in the pan, smoothing the top with a spatula.
- Bake the cheesecake in the preheated oven for 55-65 minutes or until the edges are set but the center is still slightly jiggly. Turn off the oven and let the cheesecake cool in the oven with the door cracked open for 1 hour.
- After the cheesecake has cooled, transfer it to the refrigerator and chill for at least 4 hours, or overnight for the best results.
- Before serving, top with crumbled Oreos and whipped cream (optional). Slice and enjoy!
Notes
- If you prefer a smoother top, you can run a butter knife around the edges of the cheesecake before baking to prevent cracks.
- This cheesecake can be made ahead and stored in the fridge for up to 3 days.
- You can add a drizzle of chocolate ganache or cream cheese frosting for an extra indulgent finish.
- Prep Time: 25 minutes
- Cook Time: 1 hour
- Category: Dessert, Cake
- Method: Baking
- Cuisine: American
Keywords: red velvet, cheesecake, Oreo, dessert, holiday, indulgent