Valentine’s Day is the perfect occasion to show your love and appreciation for those close to your heart. Whether you’re planning a romantic dinner or looking for a sweet gesture to share with friends and family, homemade treats are always a heartfelt way to celebrate. Valentine’s Day Fudge is an easy and delicious option that not only adds a pop of color but also delivers rich, indulgent flavors everyone will enjoy.
This simple fudge recipe combines creamy sweetness with a hint of chocolate and a dash of love. It’s a no-bake dessert, making it an easy and quick choice for busy schedules. With a smooth, melt-in-your-mouth texture and a festive touch of pink and red, this fudge will make your Valentine’s Day celebrations extra special. The beauty of this treat lies in its versatility — whether you want to customize it with different toppings, flavors, or colors, it offers endless possibilities for personalization. Plus, it can be prepared ahead of time, making it the perfect last-minute dessert for your Valentine’s Day plans.
Why You’ll Love This Recipe
- Quick and Easy: No baking required, making it a perfect last-minute treat for busy schedules.
- Customizable: You can personalize the flavor and appearance with different toppings and add-ins.
- Delicious: The rich, creamy texture and sweet chocolate flavor will satisfy anyone’s sweet tooth.
- Festive: The vibrant colors and shapes make it ideal for Valentine’s Day celebrations, adding a fun touch to your holiday treats.
- Giftable: This fudge makes a thoughtful, homemade gift for friends, family, or that special someone.

Ingredients
- Sweetened condensed milk
- Semi-sweet chocolate
- White chocolate
- Butter
- Pink food coloring
- Sprinkles or candy decorations (optional)
Variations
- Nutty Fudge: Add chopped nuts like walnuts or almonds for a crunchy texture.
- Fruit-Flavored Fudge: Mix in some raspberry or strawberry extract for a fruity twist.
- Marbled Fudge: Swirl different colored layers of fudge for a fun and colorful effect.
- Vegan Fudge: Use dairy-free chocolate and coconut milk to make a vegan-friendly version.
- Spiced Fudge: Add a pinch of cinnamon or cayenne pepper for a warm, spicy flavor.
How to Make the Recipe
Step 1: Prepare the Pan
Line an 8×8-inch baking pan with parchment paper or lightly grease it to ensure the fudge can be easily removed once set.
Step 2: Melt the Chocolates
In a microwave-safe bowl, combine the semi-sweet chocolate and sweetened condensed milk. Microwave in 30-second intervals, stirring after each, until smooth and completely melted. Do the same for the white chocolate in a separate bowl.
Step 3: Add the Butter
Add butter to the melted chocolate mixture and stir until completely melted and smooth.
Step 4: Color the Fudge
Divide the fudge into two bowls. In one bowl, add a few drops of pink food coloring to the white chocolate mixture and mix well until the color is evenly distributed.
Step 5: Layer the Fudge
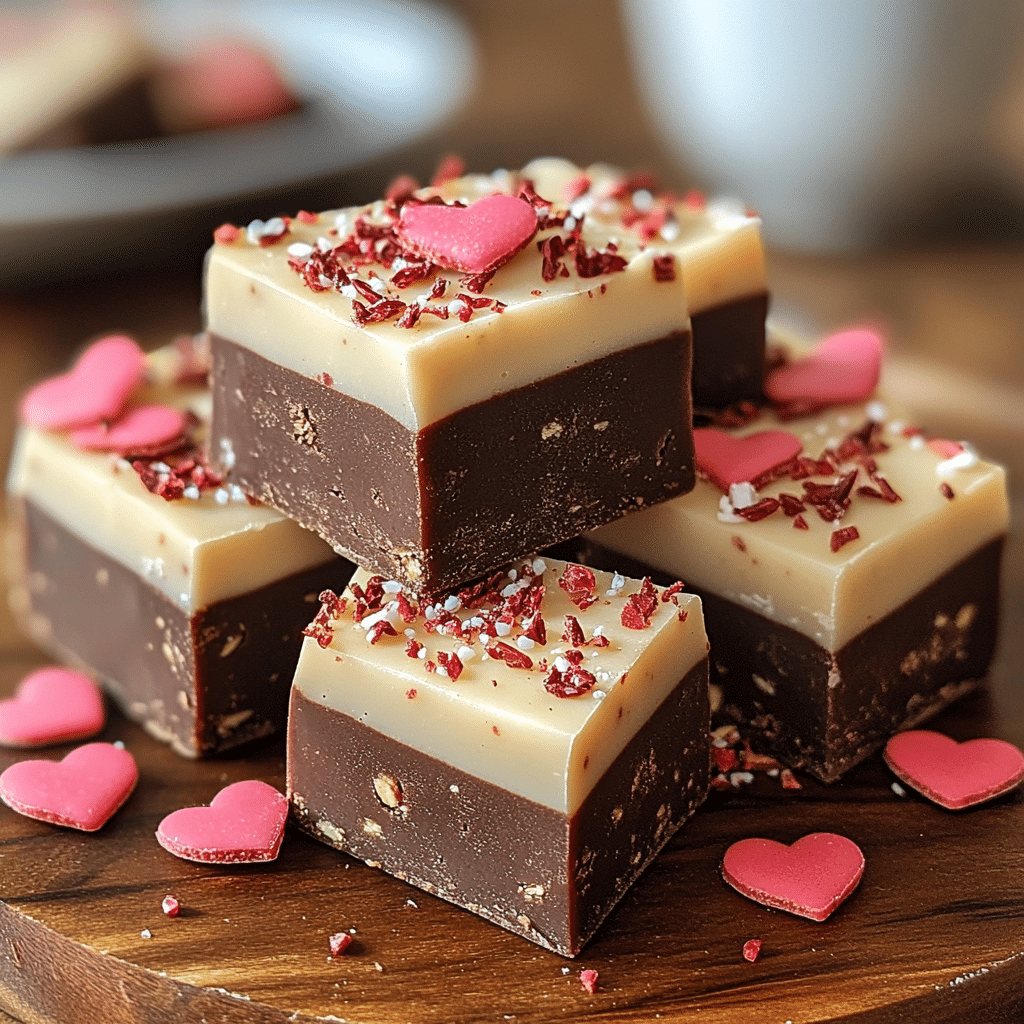
Pour the semi-sweet chocolate mixture into the prepared pan, spreading it into an even layer. Next, spoon the pink-colored white chocolate on top and gently swirl with a knife for a marbled effect.
Step 6: Add Toppings
If desired, sprinkle with candy decorations, heart-shaped sprinkles, or a pinch of sea salt for extra flair.
Step 7: Set the Fudge
Refrigerate the fudge for at least 2 hours or until it has completely set and hardened. Once firm, remove from the pan and cut into squares.
Tips for Making the Recipe
- Work Quickly: Once the fudge mixture is ready, work quickly to avoid the chocolate hardening before you can spread it in the pan.
- Use Quality Chocolate: For the best results, use high-quality chocolate for a smooth, rich flavor.
- Don’t Overheat: Be careful when melting the chocolate. Overheating can cause it to seize up, so microwave in short intervals and stir frequently.
- Custom Toppings: Get creative with toppings! You can use crushed candy, sprinkles, or even edible glitter for a festive touch.

How to Serve
- Serve the fudge in small squares as part of a dessert platter for your Valentine’s Day celebrations.
- Pair it with a hot cup of coffee, milk, or your favorite beverage to balance the richness of the fudge.
- Package it beautifully in a box or jar and gift it to loved ones as a sweet treat for the holiday.
Make Ahead and Storage
Storing Leftovers
Store leftover fudge in an airtight container at room temperature for up to a week. Make sure the fudge is fully cooled and set before storing to prevent any moisture buildup.
Freezing
If you want to prepare the fudge in advance, freeze it for up to 3 months. Wrap the fudge tightly in plastic wrap and place it in a resealable freezer bag. Let it thaw at room temperature for a few hours before serving.
Reheating
Reheating is not necessary for this recipe. If the fudge becomes too hard, you can soften it by letting it sit at room temperature for a while before serving.
FAQs
1. Can I use different types of chocolate for this recipe?
Yes, you can use dark chocolate, milk chocolate, or even white chocolate for different variations.
2. How long does this fudge last?
Stored in an airtight container, it can last for up to a week at room temperature or up to 3 months in the freezer.
3. Can I make this fudge vegan?
Yes, substitute dairy-free chocolate and coconut milk to make this recipe vegan-friendly.
4. Can I add other flavorings to the fudge?
Absolutely! Try adding extracts like vanilla, almond, or fruit flavors to customize the taste.
5. How do I make the fudge less sweet?
You can reduce the amount of sweetened condensed milk or use dark chocolate to balance the sweetness.
6. Can I add nuts to the fudge?
Yes, chopped nuts such as walnuts, almonds, or pecans would make a great addition for added crunch.
7. How do I know when the fudge is ready?
The fudge will be set once it is firm and no longer sticky to the touch. Let it chill in the fridge for at least 2 hours before cutting.
8. Can I use a different food coloring?
Yes, feel free to use any color you like to customize the appearance of the fudge.
9. Can I make this fudge without the microwave?
Yes, you can melt the chocolate and butter in a double boiler over low heat if you prefer not to use the microwave.
10. Can I cut the fudge into heart shapes?
Yes, use a heart-shaped cookie cutter to create fun Valentine’s Day-themed pieces.

Conclusion
Valentine’s Day Fudge is an easy, delicious, and customizable treat that’s perfect for the season of love. Whether you’re making it for a special someone, friends, or family, this sweet dessert is sure to impress. With its rich, creamy texture and vibrant appearance, it’s a fantastic way to spread some love and joy. Plus, the ability to customize it makes this fudge a versatile option for any occasion. So, why not make this Valentine’s Day extra special with a homemade batch of fudge?
Print
Valentine’s Day Fudge: A Sweet Treat for Your Loved Ones
- Total Time: 2 hours 15 minutes (includes chilling time)
- Yield: Approximately 12-16 squares (depending on the size)
- Diet: Vegetarian
Description
This festive, creamy, and indulgent Valentine’s Day Fudge is the perfect treat to share with your loved ones. Made with rich white chocolate chips, butter, and a touch of vanilla, this fudge is decorated with pink food coloring and topped with heart-shaped sprinkles for a sweet, celebratory touch.
Ingredients
- White Chocolate Chips
- Butter
- Vanilla Extract
- Red Food Coloring
- Heart-shaped Sprinkles (optional)
(Full measurements are provided in the recipe card below.)
Instructions
- Melt the White Chocolate and Butter: In a microwave-safe bowl, combine white chocolate chips and butter. Heat in 30-second intervals, stirring each time until smooth and fully melted.
- Add Vanilla Extract: Stir in the vanilla extract once the chocolate and butter mixture is smooth.
- Color the Fudge: Add a few drops of red food coloring to the melted fudge mixture, stirring until you reach your desired pink color.
- Set the Fudge: Pour the fudge mixture into a parchment-lined baking pan and spread it out evenly.
- Decorate: If desired, sprinkle heart-shaped sprinkles or colorful sugar sprinkles on top to make it extra festive.
- Let it Set: Refrigerate for at least 2 hours or until the fudge is firm. Once set, cut it into squares.
Notes
- Use high-quality white chocolate chips for the best results.
- For a more intense pink color, feel free to add more food coloring, but start with a small amount to avoid going too dark.
- Sprinkles are optional but add a cute touch for Valentine’s Day!
- Prep Time: 10 minutes
- Cook Time: 5 minutes
- Category: Dessert, Sweet Treats
- Method: No-bake, Stovetop
- Cuisine: American, Valentine’s Day Special
Keywords: Valentine’s Day fudge, white chocolate fudge, pink fudge, easy fudge recipe, Valentine’s Day dessert